


I have wanted to make soap for years. I first bought the supplies years ago, but then let them sit in the basement for ages and then even moved them to our current home 2 years ago. Why did I let

On this page I listed out supplies that you will want to have on hand for soaping. Keep this list on hand to refer back to as needed, but you may find you have most of the supplies you need right in your own kitchen. Note: My links are affiliate Amazon links at no cost to you. You may choose to use them or not. If you do use them, my family thanks you.
Let's jump right in to lye safety. Lye is sodium hydroxide, a base, that is necessary for the saponification process (turning oil into soap). You can find the material safety data sheet on lye online or with you product that you purchase. Here is one msds sheet. Let's break that information down. 1) Wear protective gloves. 2) Wear long sleeves. 3) Wear safety glasses. 4) Measure and mix in a well ventilated area. 5) Have water ready to wash anything that you might spill lye on. 6) Handle carefully. That's about it. Carry on, you've got this.


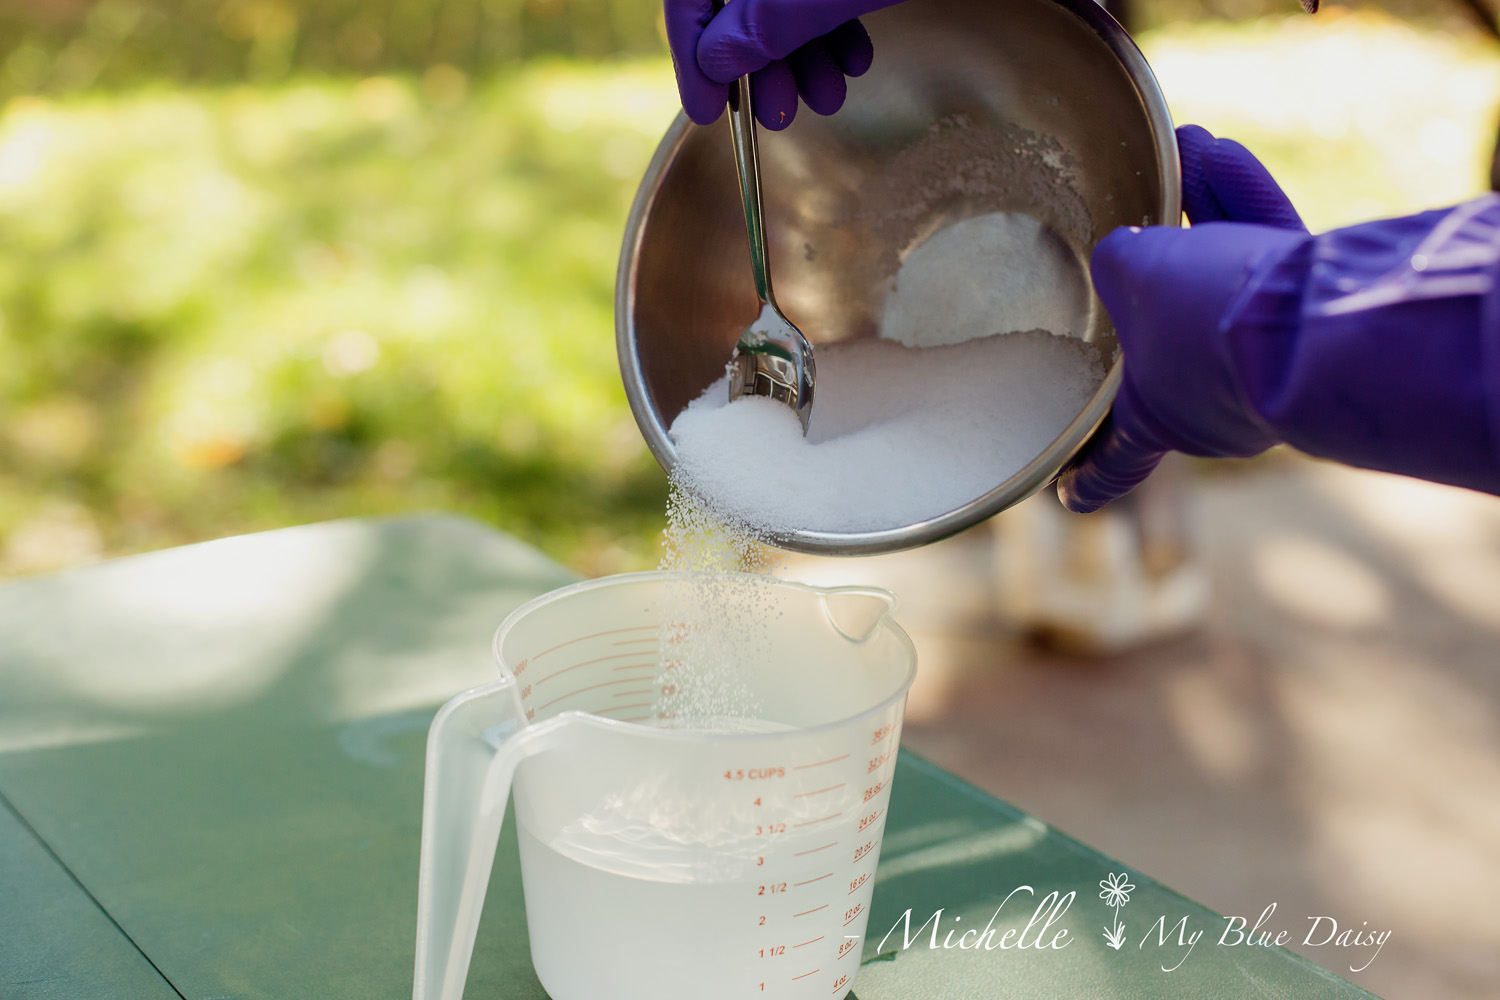
I don my safety wear (long sleeves, glasses, and gloves) and set my digital scale on some parchment paper on the counter. I weigh my lye out here because my counters and nice and steady. (How much? We'll talk recipes in a bit. Remember to always run your recipe through a lye calculator. Not sure what this is? Keep reading.) After I weigh out my lye (dry, crystals that look like a salt), I carefully carry the bowl of measured lye outside where I pour into my measured water. That's the last safety tip I can think of. Dissolving lye into water is an exothermic reaction - meaning the solution will become hot as you add the lye. That's why you want to make sure you always add the lye to the water. Lye to the water... That's your mantra as you stir. Keep a full arm length distance as you stir to avoid breathing any fumes. Once it's all dissolved, I wait a few minutes and then bring it back inside to cool before soaping.


Now that you have lye solution ready, the next thing to do is prepare your oils. There are many options on what oils to use. The most common, and readily available oils, are coconut oil and olive oil. My favorite recipe uses these two oils and also raw cocoa butter. Another oil you might want to considers is Castor oil. Coconut oil makes can help create a soap with a lovely lather - lots of bubbles. It can also help harden your soap to help make a long lasting soap. Olive oil makes a rich, moisturizing soap, but it can be a softer soap and less lather. Castor oil supports a rich later and also can harden your soap. Raw cocoa butter has a lovely natural smell (like chocolate) and creates a luxurious soap. You can research properties on other oils on this chart from Lovin' Soap. If you are interested in custom blending your fatty oils, I highly recommend thoroughly studying that chart.

The next resource you will need is a lye calculator. When making soap, it's important to measure accurately and add enough lye to create soap, but not so much that you have a skin-drying, or even caustic soap. For a small batch of soap the difference between a luxurious soap and a drying soap could be less than 0.5 oz of lye. That's why a soap / lye calculator is important. You just enter the amount of oils you have and the calculator will tell you how much lye to use. The calculator does the math for you. Perfect!
Now the lye calculator will ask you to choose a percent superfat. Superfat is basically a measure of how much "extra" oil is in your soap. If you want a soap that is very cleansing and has little to no extra oil, choose 2% superfat. Especially if you are making a soap to use for laundry. For a bath bar, 8-12% is a good range. Too high of superfat will leave you with a soft bar that is less cleansing. Too low will yield a cleansing bar that is drying. Experiment to find your happy spot.
Below is my current favorite recipe. It's a cold process recipe. More on cold process vs. hot process on a later blog. Please feel free to double check my math on a lye calculator and adjust your oils to fit your own needs. If you are using a loaf-type mold, this recipe will make about 8 - 5oz bars of soap. Note: I use virgin coconut oil, but refine will also work.

Now let's break down the process step by step.
First, measure out your fats/butters/oils. I'm following this recipe except I used Shea butter in place of cocoa butter. Keep in mind that if you swap out oils, you need to run your recipe through the lye calculator again. 30oz of olive oil requires a different amount of lye for saponification than 30 oz of coconut oil. You cannot swap most oils 1:1 in a recipe and yield the same soap.
(If you do not have cocoa butter, melt/blend together 16 oz of virgin coconut oil
Once your oils are measured, warm them up together on the stove or in a slow cooker. I usually end up with my oils around 135 degrees when they are all well melted and blended together. It's really helpful to have a temperature gun when making soap. A cooking or candy thermometer will work, but its messy and you have to clean it when going back and forth between the lye and oils. Remove the oils from the heat and let the mixture begin to cool.

While your oils are melting/cooling, carefully measure out your lye into a glass, stainless steel, or plastic #5 (polypropylene) container. I lay down parchment paper for easy clean up and measure on my counter. Be sure your area is well ventilated and pets and children know to stay back so there are no trips or accidentals spills. Measure out your water, also. Carry your water and your lye outside or to a VERY well ventilated area. This part gets fume-y. I go outside to do mine and have my daughter keep an eye on our dog who always follows me out. Once in a well ventilated area, slowly add your lye to your water. Always add lye to water and stand back a little when you do so. It's an exothermic reaction and it will get very warm. Adding water to lye could create a too warm, too fast, too fume-y mess. Once the lye is well dissolved into the water, let it sit outside for a few minutes. Keep your pets away so they don't spill it. Bring it inside, let it cool, and check the temperature every few minutes. You want your lye and your oils to cool to below 130 degrees F. Ideally, you want your lye and oils to be within 10 degrees of each other. I am impatient and I usually soap around 120-125 degrees.

Once your oils and lye are cooled to below 130, place your immersion blender into your blend of oils and tap it a few times to release any trapped air bubbles. Note: you can whisk soap up by hand. Just know that it takes a lot of arm power and about 90+ minutes of brisk whisking. Thus, I love my immersion blender for soaping.
Begin running your immersion blender then slowly pour your lye solution into your oils. I generally pour down the blender shaft to minimize splashing. Once all your lye solution is incorporated, continue pulsing your oils+lye mixture on and off while stirring. It generally takes me a little over 5 minutes to reach trace. What's trace? It's where the soap magic happens. Check out this video for a visual explanation.
If you are going to add essential oils to your soap, you will want to add them at trace. Mix them in well before pouring into your mold. As for molds, you can see in the video that I use mostly molds that I had around the house already. I have this great little wooden box and cardboard box that are just the right size for my personal preference. If you use something like this you have to line it well with parchment paper, which I admit is kind of a pain. If you choose a silicone mold like these, you will not have to bother with parchment paper. I'm looking forward to adding some of these to my soap supplies.
Once you have poured your soap into your molds, just let it set. Depending on your recipe, climate, temperature, etc., you can unmold your soap in a few hours to a day or so. My recipes are usually ready to unmold within 8 hours. Sometimes I let it set overnight and unmold in the morning. Here is what my soap looks like when I unmold, plus some clean up tips.
And cutting soap is nothing fancy either. Here is how I cut mine, and the guy who keeps me smiling. He brings the humor into our home.
To review, in short, here is how you make soap.
1. Select your recipe and check it in a lye calculator.
2. Measure and dissolve your lye into your water. Let it cool to below 130.
3. Measure, combine and warm your oils together. Let it cool to below 130.
4. Combine your lye solution into your fat solution. Blend well, pulsing until trace.
5. Pour your traced soap into your prepared molds.
6. Let set until set up - should not be squishy at all. Unmold and let sit until cooled to room temperature. If you need to cut into bars, cut. Let your soap set for 2-6 weeks so it will be fully hardened.
Please post questions below. Videos are way out of my comfort zone, so I'm sure I forgot a few things. I hope you all love your soap!!!


No comments:
Post a Comment